Apply Customer Negotiated Rates
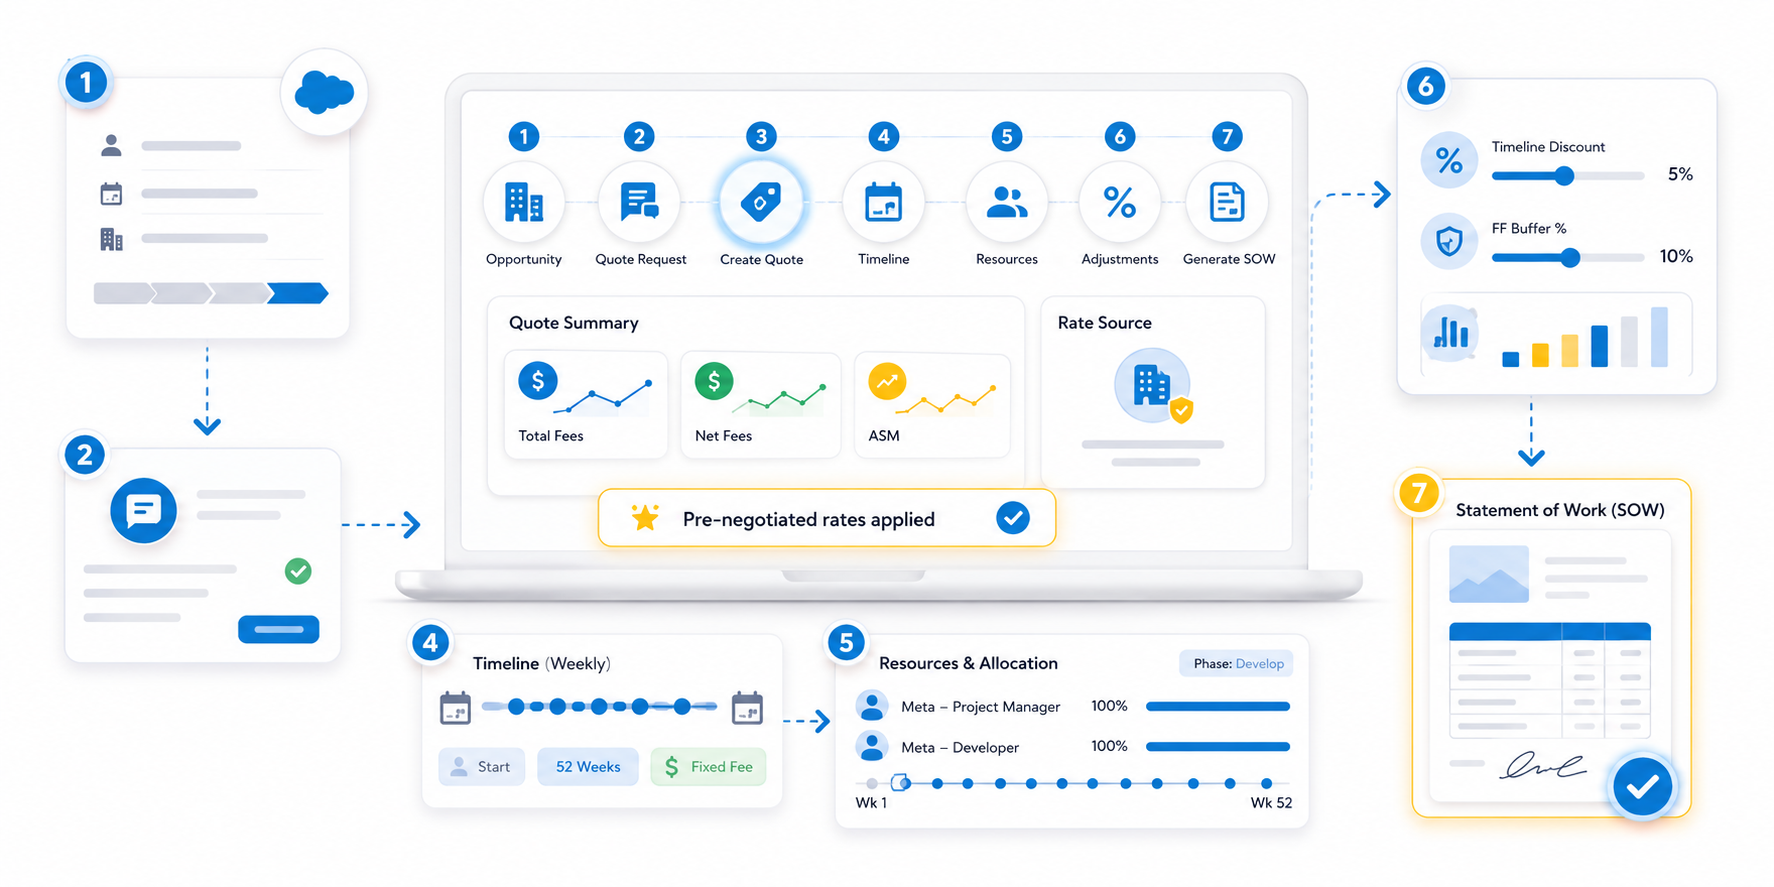
1. Setting Up the Opportunity
The process begins in Salesforce Sales Cloud . By linking your deal to an established account, you ensure all pre-negotiated terms are automatically applied.
- Create the Opportunity: Navigate to the Opportunities tab and select New .
- Key Details: Enter the Opportunity Name (e.g., Mid Size Scrum Supply to Meta ), set the Close Date, and select the appropriate Account Name (Meta).
- Stage Selection: Move the opportunity to the Proposal/Price Quote stage to begin the estimation process.
2. Initiating the PSC Quote Request
Once the opportunity is live, you need to initiate a formal quote request.
- Create Quote Request: On the Opportunity record, locate the PSC Quote Requests related list and click New .
- Define Scope: Provide a clear name for the request (e.g., Create SOW/Estimate for a Scrum to Meta - Mid Size ).
- Status Tracking: Set the initial status to Requested and save.
3. Building the Quote Record
After creating the request, you will transition into the QuoteX interface to build the financial model.
- Create Quote: Click the Create Quote button within the Quote Request.
- Account-Specific Integration: Because the account is Meta, QuoteX leverages pre-negotiated rates specific to that client.
- Assumptions: Use the Quote Assumption field to document the rationale behind the pricing (e.g., "Applying pre-negotiated rates for a high-value account" ).
4. Designing the Project Timeline
A robust estimate requires a clear timeline of when resources will be utilized.
- New Timeline: Select New Timeline from the Navigation Menu.
- Configuration:
- Frequency: Set to Weekly.
- Duration: Define the start and end dates (e.g., a one-year contract).
- Contract Type: Choose Fixed Fee or T&M based on the deal structure.
5. Strategic Resource Allocation
QuoteX allows you to pull specific roles that are already mapped to the client's rate card.
- Adding Roles: In the Resources tab, search for roles like Meta - Project Manager or Meta - Developer .
- Applying Phase Logic: You can apply specific phases (e.g., Develop ) across the entire timeline to ensure work is scheduled logically.
- Full-Time Allocation: For dedicated teams, allocate resources at 100% to reflect a full-time commitment across the 52-week period.
6. Applying Adjustments and Discounts
To meet competitive targets or executive requests, you can apply top-level adjustments.
- Timeline Discount: Apply a percentage-based discount (e.g., 5% ) to the entire timeline.
- Buffer Management: Adjust the FF Buffer % to manage risk and protect margins.
- Real-time Totals: Monitor the Total Fees , Net Fees , and ASM (Adjusted Service Margin) in the header as you make changes.
7. Finalizing the Statement of Work (SOW)
The final step is converting your data-driven estimate into a client-ready document.
- Generate SOW: Click the Navigation Menu and select Generate SOW .
- Template Selection: Choose the standard Salesforce SOW Template .
- Automated Content: QuoteX automatically populates the document with:
- Specific Role Responsibilities.
- The 52-week Resource Schedule.
- Detailed Pricing Tables (Role, Rate, Hours, and Total Price).
- Total Fees and Applied Discounts.
https://www.youtube.com/watch?v=gJv43bx2eV0