Creating Reusable Project Timelines Library
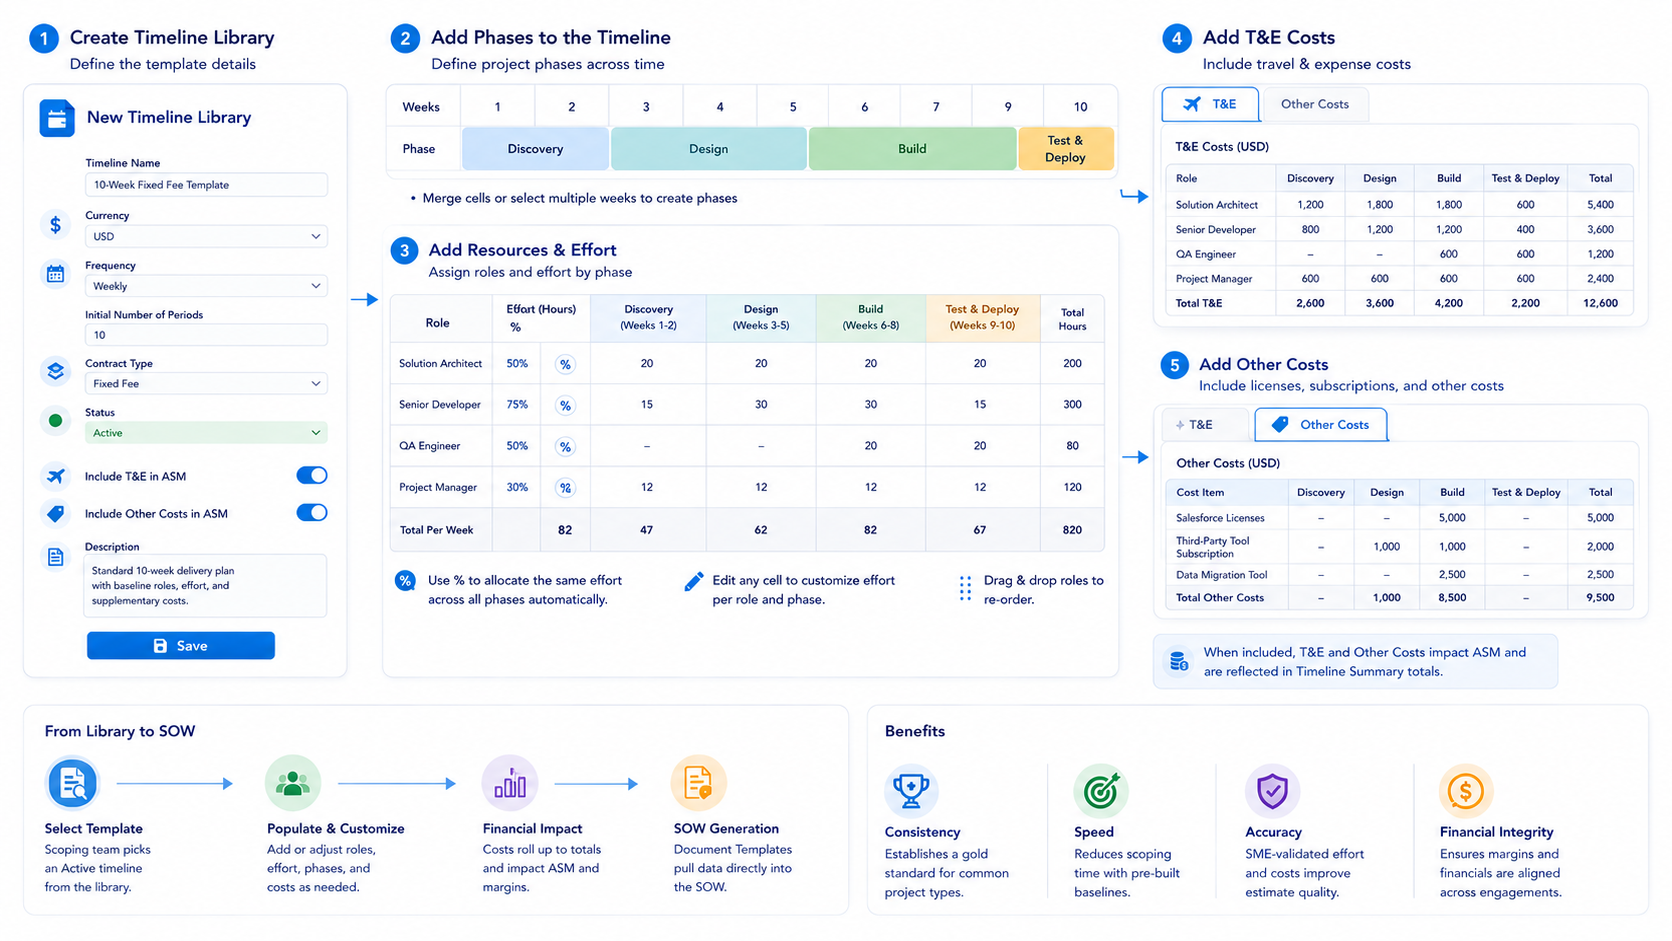
PSC Timeline Libraries allow Subject Matter Experts (SMEs) to build pre-configured resource plans and effort templates. These libraries serve as "starting points" for scoping teams, ensuring that common project types (e.g., "10-Week Fixed Fee") have a baseline of roles, effort, and costs already established.
- To build timeline templates in your Timeline Library, click on the ‘+ New Timeline Library’ from the ‘Timeline Library’ tab dropdown.
- Give your timeline template a name.
- Select a currency from the dropdown menu.
- From the dropdown menu, select the ‘Frequency.’ Available options include Weekly, Monthly, Quarterly, and Yearly.
Indicate the ‘Initial Number of Periods.’
- Add the ‘Contract Type.’ Options are T&M or Fixed Fee.
- Select a ‘Status’ for the timeline. The options are Draft, Active, Archive. Only Active timelines will be available for selection in the library.
- Indicate if you want Cost and T&E, or both, to impact ASM. When these flags are turned on, the ‘Travel and Expense’ and ‘Other Costs’ will be included in the calculation of ASM. Both of these fields, ‘Total Travel & Expenses’ and ‘Other Costs,’ are placed under the ‘Timeline Summary’ section of the Details tab in the timeline library record.
- Include a brief description of the timeline.
- Click ‘Save.’
Add Phases to the Timeline
The application will build a generic timeline based on the number of periods you specified. Your generic timeline will look something like the one below. Begin adding details to the new timeline.
- Click in the cells under each week to designate the phase.
- If you select the same phase for consecutive cells, the application will merge the cells into one phase. Or, select multiple cells to select the phase. Again, the application will merge all of the cells.
Adding Resources and Effort to a Timeline
- To add resources to your timeline, scroll down and click an empty cell under ‘Total Per Week.’ All roles on your rate cards are available to add to the timeline. Just start typing in the cell, and roles will appear in a popup. Select the role you want then move down one row and repeat the process until all roles are added.
- If a role will have the same effort across all phases of the project, click on the ‘%’ icon to the right of each role. Use this field to automatically calculate effort for a resource based on a percentage of project involvement.
As an example, if you wish to distribute the same effort proportionally for each role throughout the entire project timeline, you can leverage the percentage allocation feature in QuoteX. For instance, you may assign 50% for a particular resource by clicking on the ‘%’ symbol. The system will automatically calculate 50% of the effort for each time period for the resource, based on the specified time frequency (hours, days, weeks, months, quarters). It's important to be aware that attempting to allocate resource effort beyond the maximum allowed limit, such as 250, will trigger an error warning. It's essential to adhere to the designated constraints to avoid errors in resource allocation.
- To customize the effort per role for each phase, click directly in each cell and edit the effort.
- Simply drag and drop any role to re-organize your roles in the timeline.
Adding Costs to the Timeline
- When creating a new timeline in the Library, you can add T&E and Other Costs to the timeline. The tabs are above the timeline on the Timeline Library Details tab.
- Click the ‘T&E’ tab. In the resource section of the timeline, enter the T&E costs for each resource in the appropriate time period.
-
- Click on the ‘Other Costs’ tab, then go to the resource section of the timeline. Place the cursor in the cell and tap on the space bar. A list of all costs will appear so you can easily add other costs to your timeline. Add the cost amounts in the cell for the appropriate time period.