Full Experience Flow
Full Experience Flow
powered by QuoteX + DRTE + F360 | CodeyLabs
Step 1: Title Slide
Flow of Experience overview: QuoteX + DRTE + F360 integration by CodeyLabs.
Step 2: Opportunity Record – Starting Point
Navigate to the Opportunity (e.g., 'Flow of Experience – Demo') in Salesforce Sales. Click the dropdown arrow next to PSC Quote Requests in the Related panel.
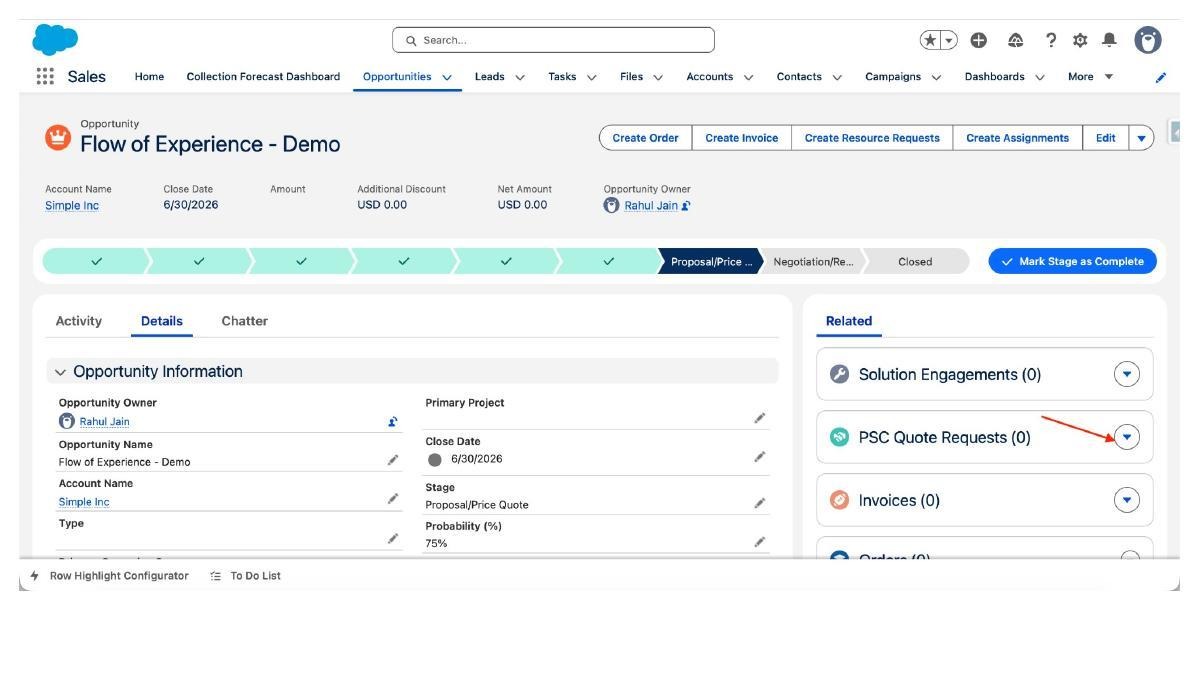
Step 3: Create New PSC Quote Request
A modal dialog appears: 'New PSC Quote Request'. Fill in the Name field (e.g., QR – Flow of Experience Demo), link the Opportunity, set Currency to USD, and set Status to 'Requested'. Click Save.
Step 4: Fill Request Detail & Save
Scroll down to the Request Detail section. Enter the Description (e.g., QR – Flow of Experience Demo). Fill in Reviewer Details if needed. Click Save to create the Quote Request record.
Step 5: PSC Quote Request Record Created
The PSC Quote Request record opens. Note the tabs: Details, Summary (Primary Quote), Document (Primary Quote), DRTE. On the right, PSC Quotes and E-Signature Workflow panels are visible. Click the dropdown next to PSC Quotes.
Step 6: Add New Quote
A form appears: 'Add New Quote'. Fill in the Name, Currency ISO Code, Owner, Date Scoped, Quote Request (linked), and Description. Click Save.
Step 7: Quote Record Created
The Quote record is created and linked to the Quote Request. Scope & Assumptions section becomes available.
Step 8: Add Scope Items
In the Scope & Assumptions section, click 'Add/Modify' to add scope items from the library.
Step 9: Select Scope Library
Choose a Scope Library (e.g., Salesforce – General Advance). Browse and select scope items to include in the quote.
Step 10: Add From Scope Library
The 'Add From Scope Library' dialog appears. Select items such as Salesforce General, Sharing and Security stories, Salesforce for Outlook, Email Templates, etc. Tick the checkboxes, then click Add.
Step 11: Scopes Added to Quote, Add Rate Blend (based Staffing Rules by SME)
Selected scope items now appear in the Scope & Assumptions table of the Quote record with hours (LOE) and complexity details.
Step 12: Set Resourcing Plan Templates
Step 13: Hit Apply Next To Total Contract Value/ROM
Step 14: Add/Modify/Delete Scopes Like Spreadsheet
Step 15: Quote Information & Capacity Needed
The Quote record shows Quote Information panel (Name, Date Scoped, Owner, Quote Request, Opportunity, Account). The right panel shows 'Capacity Needed – Click Refresh' to view resource capacity details.
Step 16: Refresh Capacity Data
Click the Refresh icon in the Capacity Needed panel to load the latest resource capacity required for the quote.
Step 17: Add Timeline
Click 'Add New Timeline' button to create a timeline for the project associated with this quote.
Step 18: Timeline Created
A Timeline record is created under the quote. Configure with start and end dates.
Step 19: Timeline Resource Planning
Within the Timeline, go to the Resources related list. Add resources by role (Business Analyst, Developer, Project Manager, Technical Lead, etc.) with hours per week.
Step 20: Capacity Needed – By Role
The Capacity Needed panel (by Role) shows total hours needed per role: Business Analyst (520), Developer (624), Project Manager (520), Technical Lead (364), Technology Architect (208), Test Engineer (312). Total: 2,548 hours.
Step 21: View the timeline and validate
Step 22: Go back to Quote Request Record
Step 23: Change QR status to Quote Review Requested
After internal approvals, The Quote/SOW needs reviews and approves by customer. The Status field on the Quote Request updates accordingly.
Step 24: Create Signature Requests
On the PSC Quote Request record, use the 'Create Signature Requests' button to generate document dynamically and send it to the customer for review and approval
Step 25: Create Signature Requests – Select Document Template
Click 'Create Signature Requests' on the PSC Quote Request. A dialog shows available templates: Fixed Fee SOW (USD) ON Quote Request, SOW (USD) ON Quote Request (selected), SOW (USD) ON Quote Request (Demo), SOW (USD) ON Quote Request with Outcome Based. Select the appropriate template and click Next.
Step 26: Customize Document for Signature
Review and customize the document content before sending for signature. Edit sections as needed.
Step 27: Add Signers
Add the signers (e.g., customer contacts) who need to sign the document. Enter their email addresses.
Step 28: Configure Signature Fields
Place signature fields in the document at the appropriate locations for each signer.
Step 29: Preview Document
Preview the final document before sending it to the signers for electronic signature.
Step 30: Select Email Invitation Template (Skip this step for Trial and close the window using (x) here)
Step 31: E-Signature Sent
The e-signature request is created for the customer. The E-Signature Workflow panel on the PSC Quote Request record shows the request status.
Step 32: Hit Begin Workflow for Customer to Receive Signature Request
The customer receives an email with a secure link to review and sign the document.
Step 33: Customer Signs the Document
The customer opens the document via the secure link and applies their electronic signature.
Step 34: Signature Completed
Once all parties have signed, the document status updates to Completed in the E-Signature Workflow panel.
Step 35: E-Signature Status – Completed
The PSC Quote Request shows Status: Quote Review Requested. In the E-Signature Workflow panel, the ESR record (ESR-0000038, Rahul Jain / Simple Inc) shows Status: COMPLETED with signature details and [SIGNATURE2] tag.
Step 36: Quote Approved
The Quote Request status transitions to 'Quote Approved' after the e-signature is completed and the internal review process begins.
Step 37: Internal Review Process
Internal stakeholders review the signed quote. Comments and updates can be tracked in the Chatter section.
Step 38: Quote Request Status Completed
After internal review, the quote status updates to 'Completed'. The Net Fees and As Sold Margin are confirmed.
Step 39: Opportunity Updated
The Opportunity record updates with the quote amount synced from the approved PSC Quote Request.
Step 40: Opportunity Shows Approved Quote Amount
The Opportunity (Flow of Experience – Demo) now shows Amount: USD 163,867.20, Net Amount: USD 163,867.20. PSC Quote Requests related list shows QR – Flow of Experience Demo with Status: Quote Approved.
Step 41: See the Opportunity Products Added thru Sync process
Step 42: Create Resource Requests Now
Step 43: Select Related QR to generate Resource Requests In System
Step 44: RR Created
Step 45: Create Resource Requests
Click 'Create Resource Requests' from the Opportunity. Resource Requests (6) are generated: PSCRR-00184 (Business Analyst, 378h), PSCRR-00185 (Developer, 400h), PSCRR-00186 (Project Manager, 320h), PSCRR-00187 (Technical Lead, 340h), PSCRR-00188 (Technology Architect, 360h), PSCRR-00189 (Test Engineer, 240h) – all Submitted, running 6/1/2026–8/10/2026.
Step 46: Resource Requests Submitted
All Resource Requests are shown with Status: Submitted in the Related list on the Opportunity. These are also visible in the PSC Resource Requests related list on the right panel.
Step 47: Create Assignments
Click 'Create Assignments' from the Opportunity to set up project assignments.
Step 48: Project Created – Assignments Setup
A project is created (e.g., Project-Flow of Experience – Demo) from the Create Assignments workflow.
Step 49: Create Assignments – Step 1
The Create Assignments dialog appears. Confirm the Project Name, Project Start Date, and Project End Date.
Step 50: Create Assignments – Set Dates
Fill in Project Name: 'Project-Flow of Experience – Demo', Start Date: Jun 1, 2026, End Date: Oct 31, 2026. Click Next.
Step 51: Assignments Created
Assignments are created for each resource role on the project, linking to the resource requests.
Step 52: PSC Project Record
A PSC Project record is created and linked to the Opportunity and resource assignments.
Step 53: Project Details
The PSC Project record shows project details including milestones, timelines, and assigned roles.
Step 54: Its time to send NPS Survey to Customer
Step 55: Project Surveys – Add From Library
In the Project record, go to Surveys (0) related list. Click the dropdown and select 'Add From Library' to add a survey (e.g., NPS Survey).
Step 56: Survey Added to Project
The NPS Survey (or clone) is added to the Project's Surveys related list.
Step 57: Survey Invitation Setup
Configure the survey invitation settings – choose the survey, user/contact to send to, and email options.
Step 58: New Survey Invitation – Fill Form
Click New under Surveys. Select the Survey (Clone of: NPS Survey). Allow Guest to Access and Click Save.
Step 59: Survey Invitation Creation Process
Step 60: New Survey Invitation Modal
The 'New Survey Invitation' modal shows fields: Survey (Clone of: NPS Survey), Send Email, Email Sent, User (Search People), Token, SurveyTokenizedURL (https://qxtestdrive.my.site.com/survey/s/?token=), Survey Submitted checkbox, Invitee First Name. Click Save.
Step 61: Survey Invitation Sent
The survey invitation is sent to the customer via email with a secure tokenized URL.
Step 62: Customer Opens Survey
The customer clicks the survey link and opens the NPS Survey in their browser.
Step 64: NPS Survey – Question 2
Additional survey question(s) are presented to the customer for feedback.
Step 65: NPS Survey – Customer View
The NPS Survey page displayed to the customer asks: 'Would you recommend us to a friend or a colleague?' with emoji-based rating options (1 of 2 pages).
Step 66: Survey Submitted
The customer submits their survey response. The Survey Submitted flag updates in Salesforce.
Step 67: Survey Results in Salesforce
Survey responses are captured and visible in Salesforce on the Project record's Surveys related list.
Step 68: Thank You
End of the Flow of Experience demonstration. Thank you for watching.